By alexmoreno, 12 August, 2020

Using an old Workstation to speed up your local development

After the frustration of watching how 16GB in an expensive MacBook Pro was not enough to power the tools I use for my local development I decided to buy a cheap old Workstation in Ebay (around 100£) and I set it up to be synced with my Mac as a local development tool.

Learn how I did it and how you can benefit of that as well for a happier, more productive developer life.

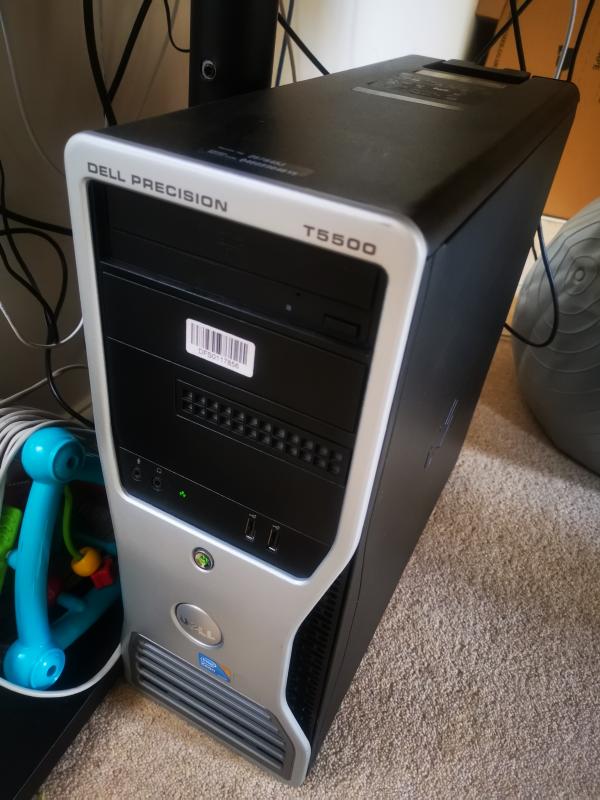
dell precision t5500 workstation

My 100£ Dell Precision t5500 workstation

Introduction

I think I am not alone in this pain. Docker, Kubernetes and related tools are amazing, but to save ourselves time we have leveraged our local setups to extra layer of complexities like DDEV or Lando, which I ABSOLUTELY LOVE IT, but which on themselves causes another problem: they are tools hungry of resources.

 Every time you are spinning up a site and doing something complex, say a Drupal migration, a script running for a few seconds or minutes… your laptop fan (Mac or whatever you are using) would start spinning like crazy, make the whole room a lot warmer and sound like it would take of at any moments notice. 

I got tired of this and I looked for several options. One was to follow the steps of Jeff Geerling, and build a cluster of raspberries. However that would imply more time that I think I had available and, to simplify things, I found that you could find pretty powerful servers in ebay for a few bucks with quite a nice amount of RAM. That's where my adventure with my new 8 years old Dell Desktop server started.


The machine

I end up buying a Dell Precision T5500 Workstation PC Computer MiniTower, which packs a Xeon Quad Core x5675. Ful specs:

  • Xeon Quad Core x5675, 24GB RAM, 2x1TB HDD Storage
  • Stylish, Modern, Workstation business desktop. MyDigitalTech one of only Five Microsoft Authorized Refurbishers in the UK
  • Genuine Microsoft Windows 10 Professional, 14 day no quibble returns policy, and 12 month collect and return warranty
  • nVidia Quadro 4000 graphics card 

I liked this particular one for several reasons. One is the amount of RAM you could end up cramming in there, which is particularly good for the application I wanted to give to this machinery (webserver). It came with 24GB, but I could pack up to 72GB, which is probably what I'm going to do soonish :-).

The other one is that the motherboard is a dual with the possibility of adding an extra chip. So as you can see, I still have a lot of options to make this even better machine. I just paid 150£ but I can probably spend 3 times that upgrading it, which is bad for my pocket but good for my tinkering :-)

 Here is the full specs of this bad boy https://www.dell.com/support/article/uk/en/ukbsdt1/sln290521/precision-t5500-precision-desktop-workstation-specifications?lang=en 

Said that, any old server around the 100£ budget should work for this purpose. I have not gone for the option of a Raspberry Pi or similar, but that could be another option as well and I'm not discarding doing it at some point. If any, the workstation is… well, a huge brick and super noisy. Changing it with a smaller NUC or a mini ITX is very tempting to be honest.

Another good option would be to get a cheap DigitalOcean server, and run the same stuff on that server. That could have some extra benefits as you could simply pause that server when not in use, so save some money, but it's also a bit more complex setup that this one that I am doing (and, I'll be honest, I like playing with chips, machines and whatnots :-) ).

RAM options

RAM options

Play time

Going into configuring and tinkering with the , I went through the Ubuntu isos, installed it in parallel with the Windows that came with the machine, and did a bit of tweaking until I found it right to my liking.

Why I chose Ubuntu is because I always loved the Debian distro, so being Debian based but a bit more updated (although not that secure) I did not have too much thought on it.

NOTE: Since I wrote this article I moved to Mint, as I found some issues when restarting the machine and grub.

What I did a bit more research is on the Xsersver I wanted to install. I did want something as light as possible, so it would not consume resources away from the Docker/Webserver.

What a found very nice is that Macos already come with a VNC server that you can use straight away, called screen sharing. Once opened, it will ask for your user and remote password and connect to the X session on the remote machine. Simple. 

I had to do a bit more work on the server side configuring tightvnc, but I liked that vnc because it was actually simple and straightforward

You need to add this line in the etc/hosts of your mac 

/etc/hosts file

  1. # Sauron / Lando
  2. 192.168.1.40 alexmoreno-playground.lndo.site

Where 192.168.1.40 is the network IP of your server. Once done, you'll be able to jump to your Mac (or whatever you are using) browser and browser like on this image


Remote desktop in action

Remote desktop in action

Something to note here is that, if you just plan to use this machine as a remote server, with Docker, Vagrant or related tools, you may actually not need a graphical interface at all, and simply with ssh access should suffice. That will actually save some resources for what's really important on this machine (to server apache requests as fast as possible).


Simplifying the access

First things first, you'll need to access your server remotely. For that you are going to need to:

1. Install ssh

sudo apt-get install openssh-server

2. Make sure the ports are open

 sudo ufw allow ssh

Now, I don't want to be inputting my password every time I want to to ssh into the machine to execute something on the terminal. That has an easy solution in the shape of public keys. I won't go into details in doing that, but there are wonderful tutorials to easily do that in a few minutes, digitalocean for example is one of my favourites:

https://www.digitalocean.com/community/tutorials/how-to-set-up-ssh-keys--2

If you already have your ssh keys (which if you work with git and similar tools, you'll likely have already), then just doing this will work for you: 

 ssh-copy-id

Example: 

 ssh-copy-id alex@sauron

You'll get a password prompt and that's it. It couldn't be easier than that.

Setting up your sites

So far 've been using ips. However I do not like to use ips, they are hard to remember. Easy to fix, if you are in Linux or Mac simply go to /etc/hosts and add a line like this:

192.168.1.86 demoenv.lndo.site

Which will point to the public IP of your server (in your local network) and add an alias for you to use instead of those pesky Ips.

Now, depending on what you are using to host locally your sites, next steps can be different. See for example how it can be done in Drupalvm, Lando and Acquia Developer Studio and DDEV.

DDEV

https://github.com/drud/ddev/pull/1834

In a nutshell: 

 ddev poweroff

You probably want as well to create the SSL certificates, as your browsers will be complaining or even refusing showing your ddev pages. Good news is, it's really easy peasy: https://www.ddev.com/ddev-local/ddev-local-trusted-https-certificates/


With ddev, if you are ok to use ngrok it can be quite straightforward:

  1. ddev share

You need to have installed ngrok, but it's straightforward and ddev itself will guide you with a link to the instructions.

A different approach in line with the ones I've taken with Lando and DrupalVM would be to expose the ports, which you can do following this:

https://github.com/drud/ddev/issues/1794#issuecomment-521402633

For Firefox to open your server you may need as well to add a correct certificate to your ddev container:

https://www.ddev.com/ddev-local/ddev-local-trusted-https-certificates/

Lando

If using Lando (or acquia developer studio), you'll need to specify that you want your project to be accessible from outside of your machine. Just add this line in this file ~/.lando/config.yml

bindAddress: 0.0.0.0

The only inconvenient on Lando that I found is that Lando seems to change the ports every time you restart the app. That mean you will have to be changing the url to which access, for example I was using this one the day before writing this:

https://demoenv.lndo.site:32773/

While now, after restarting the server and docker I found that the site was not accessible on that previous url. Checking what Lando is outputting in the terminal you'll be able to see:

  1. NAME demoenv
  2. LOCATION /home/alex/projects/acquia/nespresso/demoenv
  3. SERVICES appserver, database, phpmyadmin
  4. APPSERVER URLS https://localhost:32783
  5. http://localhost:32784
  6. http://demoenv.lndo.site/
  7. https://demoenv.lndo.site/
  8. PHPMYADMIN URLS http://localhost:32781

Which points you to the new url/port, in this case:

https://demoenv.lndo.site:32783/

Acquia Developer Studio

If you are using Acquia Developer Studio the containers start silently. However you can get that info with lando info:

  1. $ lando info
  2. [ { service: 'appserver',
  3. urls:
  4. [ 'https://localhost:32773',
  5. 'http://localhost:32774',
  6. 'http://demoenv.lndo.site/',
  7. 'https://demoenv.lndo.site/' ],
  8. type: 'php',
  9. healthy: true,
  10. via: 'apache',
  11. webroot: 'docroot',
  12. config: { php: '/home/alex/.lando/config/drupal8/php.ini' },
  13. version: '7.2',
  14. meUser: 'www-data',
  15. hasCerts: true,
  16. hostnames: [ 'appserver.demoenv.internal' ] },
  17. { service: 'database',
  18. urls: [],
  19. type: 'mysql',
  20. healthy: true,
  21. internal_connection: { host: 'database', port: '3306' },
  22. external_connection: { host: '0.0.0.0', port: '32769' },
  23. healthcheck: 'bash -c "[ -f /bitnami/mysql/.mysql_initialized ]"',
  24. creds: { database: 'drupal8', password: 'drupal8', user: 'drupal8' },
  25. config: { database: '/home/alex/.lando/config/drupal8/mysql.cnf' },
  26. version: '5.7',
  27. meUser: 'www-data',
  28. hasCerts: false,
  29. hostnames: [ 'database.demoenv.internal' ] },
  30. { service: 'phpmyadmin',
  31. urls: [ 'http://localhost:32770' ],
  32. type: 'phpmyadmin',
  33. healthy: true,
  34. backends: [ 'database' ],
  35. config: {},
  36. version: '5.0',
  37. meUser: 'www-data',
  38. hasCerts: false,
  39. hostnames: [ 'phpmyadmin.demoenv.internal' ] } ]

To install ADS and/or Lando and related requirements visit:

https://docs.acquia.com/dev-studio/

DrupalVM

If you use DrupalVM, you'll need to add this line in your box/config.yml

 vagrant_public_ip: "192.168.1.111"

Replace the ip here with a new ip that you want to use to access to your new website. Remember that this needs to be a new ip, not the ip the host is using at the moment. For example the IP on my server is 192.168.1.90, while the IP I'll use to access my website will be 192.168.1.20

In Vagrant, but this would apply to docker as well, I increased the 500MB that the machine is using to a couple of nice, tasty GB. That should make the site to feel a bit faster, and who does not like a faster site, doesn't it?

vim box/config.yml

 vim box/config.yml php_memory_limit: "2048M"


Remote or local IDE

After trying different alternatives, I have end with with probably the most flexible from my point of view: just mount the file system of the remote server in your local, so you can pretty much use any editor you fancy

See https://medium.com/@tzhenghao/writing-remote-code-on-a-mac-with-sshfs-c62d64bf9ef9

  • Install in Mac
    • brew install sshfs

Mount:

  1. sshfs alex@sauron:/home/alex/projects/cohesion/cohesiontest cohesiontest/

For Mac you'll need to install Fuse: https://osxfuse.github.io/

On itself, Fuse will not do anything.


fuse in MacOS

fuse in MacOS

But, if you head to the terminal, you'll notice that you have a new shiny toy: sshfs


  1. $ sshfs alex@sauron:/home/alex/projects sauron/
  2. :$ ls sauron/
  3. acquia/ test-lando/ test2/


Note that sauron is just the server alias, which I have an entry in my etc/hosts for: 

# Sauron / Lando

192.168.1.86 sauron

So this command is the same as doing this:

$ sshfs alex@192.168.1.86 :/home/alex/projects [FOLDER] 

Now you should be able to load your PHPStorm, VS Code or whatever is your preferred editor, and open the new mounted folder. The editor should be happy and even not notice anything at all. PHPstorm was throwing some warnings as it was detecting that it was not a local filesystem, but nothing to be worry at all.

Just a curiosity, in MacOS whenever you try to open that folder it will appear as a mounted filesystem (OSXFUSE Volume 0), not as a normal folder like it looks in your terminal.

Sharing filesystem throug sshfs

Sharing filesystem throug sshfs

The only inconvenience I've found is that creating new files and folders in the terminal directly does not allways reflect immediately in PHPStorm, even when I'm forcing the IDE to refresh that folder. I had to end up creating the files in the editor, but I'm sure there must be something that can be done to improve this flow. On any case, the files appeared a few seconds later, while I was doing other tasks.

There are very good readings about this subject, head to this link or Google if you are interested on knowing more about sshfs:

https://www.digitalocean.com/community/tutorials/how-to-use-sshfs-to-mount-remote-file-systems-over-ssh

While this gets the job done and is easy enough to have it working in a few minutes, I am probably missing some performance for which PHPStorm is probably punishing me. The next step in terms of improving this setup would be to move over a more network designed filesystem sharing, like NFS.

See some performance comparisons for example between different solutions: https://blog.ja-ke.tech/2019/08/27/nas-performance-sshfs-nfs-smb.html#:~:text=NFS%20handles%20the%20compute%20intensive,NFS%20or%20SMB%20in%20plaintext!

It shouldn't be a big challenge to do that step though:

Issues:

Alternatives:

https://www.jetbrains.com/help/phpstorm/accessing-files-on-remote-hosts.html


Remote GUI Desktops

Now, another solution I have spent some time but definitely not enough is on a proper remote desktop setup. 

I spent some time setting up tightvnc, and it works. It's easy to set it up, but with some limitations that I did not have the time to research. The most annoying to me was the screen size, it was limited to a relatively small one. I am used to a HUGE screen, so don't take my word on this, the size may actually suffice for some people, and if you think about it, you don't necessarily need a GUI… unless you find that it works really well and you want to start using it as some kind of remote primary computer…

Now, I was happy with that setup… until I accidentally stumbled myself with Google Chrome Remote Desktop: https://remotedesktop.google.com/

The best thing about this alternative is that... well, it just works, and really well I must say. Doing things like resizing the window will update the resolution automatically, the mouse transition really well between your Desk and the remote one, nearly 0 lag (at least on my setup)... I do most thing on the terminal, and use the /etc/hosts trick so I can have a nearly native experience although all, server and files are remote, but when I have to do something on that machine that requires GUI I have found myself just not bothering, this solution works really well.

Another really good thing about this is, you can jump into another machine and just using your Google credentials and assigned pin you can use that remote desktop virtually anywhere in the world. I have even used my iPad pro, although, well, for more articles I see about using an iPad for development I would not recommend it at all.

remote desktop
remote desktop
remote desktop

Using Google Chrome Remote Desktop

Latency and the need for speed

Latency is a bit annoying. However I solved that moving from wifi to direct old school cable. Nothing beats cable, and after I installed that I could quite appreciate see how the connection was much faster in terms of not noticing any latency or delay when I was moving the mouse or I was starting to write any message in the terminal.

Network cabe vs wifi

Network cabe vs wifi

Future

As I mentioned, I'll probably do some upgrades on ram and extra processor. I want to see how is for now in terms of performance so I can judge the upgrades properly. And i have to say the server performs beautifully, very fast and leaving my main computer free to run other "mundane" apps, like Zoom, gmails, calendars, PHPStorm or any other code editor, etc...

I could easily throw some money at RAM and a bit more buying another processor as this Workstation admits up to two processors, but for now they is no real need for that really, as I already mentioned the setup works really well and fast.

Fans are a little bit noisy. I would look into fixing that first, or maybe even move the server into a different room… although having it in the room I work keeps my office quite warm. On the other hand, after a few minutes to totally forget about the fans. Maybe another solution is moving the Workstation to a different room, maybe next to the router.

I also mentioned about moving sshfs to nfs.

Other things I need to research:

  • This is very Drupal specific, but if you are running Drupal sites inside the machine, you may consider to setup Drush to run against the new Machine, instead of connecting via ssh to execute tasks.Browser
  • I discovered Cloud based IDE thanks to Acquia Site Studio, which uses it for its remote IDES. They work extremely well, so maybe it's worth a try

In general I intend to keep this as a living document. I would like to add:

  • an index, so it's easy to reach to each section and grab the information quickly,
  • improve the code highlighter. At the moment I am using Geshi filter, but the experience seems inconsistent and it does not look always right
  • Others

What do you think? Please leave your comments in Twitter or Linkedin :-)